Remote JobLauncher
개요
Remote JobLauncher는 온라인 상에서 별도의 배치 서버의 Batch Job작업을 실행시키는 역할을 한다.
온라인 상의 Client와 Server를
이용하여 요청된 배치 작업을 수행한다.
구성
온라인상의 Remote JobLauncher를 구현하기 위하여 Hessian Binary Web Service를 사용한다.
Hessian 웹서비스는 별도의 대형 프레임워크를 설치하지 않고도 간편하게 사용할 수 있은 웹서비스이며, HTTP기반의 경량 바이러리 프로토콜로 별도의 확장없이 바이너리 데이터를 전송하는데 적합하다.
또한, 스피링의 HessianProxyFactoryBean과 HessianServiceExporter를 사용하여 편리한 Integration을 지원한다.
Hessian을 사용하기 위하여 아래와 같이 라이브러리 디펜던시를 설정한다.
<dependency>
    <groupId>com.caucho</groupId>
    <artifactId>hessian</artifactId>
    <version>4.0.38</version>
</dependency>
아래의 예제는
표준프레임워크 개발환경(v3.7)의 배치 템플릿 (SAM파일 Web 기반)을 사용하여 기존의 JobLauncher를 웹서비스에 등록하여 외부(Client)에서 호출하여 실행한다.
본 가이드의 실행 예제는 RemoteJobLauncher 예제에서 다운로드하여 확인할 수 있다.
Remote JobLauncher의 예제 작성 방법을 다음과 같다.
Web 서비스 (Server)
- (Step 1) 표준프레임워크 개발환경에서 배치 템플릿을 생성한다.
템플릿의 대상은 SAM파일 형식의 Web 프로젝트이다.
관련 템플릿 생성 방법은 배치 템플릿 위저드를 참조한다.
- (Step 2) 생성된 배치 템플릿에 Hessain Web Service의 라이브러리를 등록한다.
- (Step 3) 서버의 RemoteJobLauncher를 작성한다. (interface 및 Implement 클래스 작성)
RemoteJobLauncher의 구현체는 Template의 BatchRunController의 batchRun을 참조한다. - (Step 4) 작성된 RemoteJobLauncher를 스프링의 HessianServletExporter을 이용하여 빈생성과 새로운 Servlet을 작성한다.
테스트 (Client)
- (Step 1) Client에서는 HessianProxyFactoryBean을 사용하여 서버의 웹서비스 Url을 등록한다.
- (Step 2) 등록된 웹서비스를 통하여 RemoteJobLauncher를 실행한다.
설명
Remote 웹 서비스 (Sever-side)
Step 1 개발환경의 배치 템플릿 생성
개발환경의 “New Batch Template Project”를 이용하여 SAM파일 형식의 Web 기반 템플릿을 생성한다.
배치 템플릿 관련 자세한 사항은 배치 템플릿 위저드를 참조한다.
Step 2 Hessain Web Service의 라이브러리 등록
작성할 Batch JobLauncher를 온라인상에서 실행하기 위하여 바이너리 형식의 간편한 Web Service인 Hessian을 사용하며, 해당 라이브러리를 pom.xml에 등록한다.
<dependency>
    <groupId>com.caucho</groupId>
    <artifactId>hessian</artifactId>
    <version>4.0.38</version>
</dependency>
Step 3 RemoteJobLaucher 작성
RemoteJobLauncher는 웹서비스에 호출할 수 있는 인터페이스이며 이를 통하여 작성된 배치를 실행하고, 또한 필요한 경우 결과값을 넘겨주는 역활을 한다.
작성된 RemoteJobLauncher를 HessianServiceExporter에 등록하기 위하여 인터페이스 클래스와 구현체(Implement)클래스를 작성하여야 한다.
package egovframework.example.bat.remote;

import java.util.HashMap;

public interface RemoteJobLauncher {

	public HashMap<String,Object> callRemoteBatchRunner(String jobName);

}
package egovframework.example.bat.remote;

import java.util.ArrayList;
...
import egovframework.rte.bat.core.launch.support.EgovBatchRunner;

public class RemoteJobLauncherImpl implements RemoteJobLauncher {

	...

	@Override
	public HashMap<String,Object> callRemoteBatchRunner(String jobName) {

        //배치 템플릿의 BatchRunController.java의 batchRun메소드를 참조한다.
        ...

        return resultMap;
        }
- callRemoteBatchRunner메소드는 배치 템플릿의 BatchRunController클래스의 batchRun메소드를 참조하여 작성한다.
Step 4 RemoteJobLauncher로 빈생성 및 서블릿 등록
- 빈등록을 위하여 HessianServiceExporter를 사용하며, 인자값으로 service와 serviceInterface를 작성한다.
HassianServiceExporter의 name(EgovJobLauncher.remote)은 요청 Url 서비스의 매핑 주소이며, 별도의 명시적 매핑 핸들러를 지정하지 않고도 DispatcherServlet의 매핑에 해당 Bean의 이름을 통하여 서비스를 제공한다.
<bean name="/EgovJobLauncher.remote" class="org.springframework.remoting.caucho.HessianServiceExporter">
	<property name="service" ref="remoteJobLauncher" />
	<property name="serviceInterface" value="egovframework.example.bat.remote.RemoteJobLauncher" />
</bean>
<bean id="remoteJobLauncher" class="egovframework.example.bat.remote.RemoteJobLauncherImpl" />
** 웹서비스 호출 예시 **
http://<domain_address>/<context_path>/EgovJobLauncher.remote
- 서블릿 설정은 web.xml에 별도로 작성한다.
본 가이드에서는 *.remote사용하여 별도의 url-pattern을 작성하였다.
<servlet>
	<servlet-name>remoting</servlet-name>
	<servlet-class>org.springframework.web.servlet.DispatcherServlet</servlet-class>
	<init-param>
		<param-name>contextConfigLocation</param-name>
		<param-value>/WEB-INF/config/egovframework/springmvc/hessian-servlet.xml</param-value>
	</init-param>
	<load-on-startup>1</load-on-startup>
</servlet>
<servlet-mapping>
	<servlet-name>remoting</servlet-name>
	<url-pattern>*.remote</url-pattern>
</servlet-mapping>
테스트 (Client-side)
Remote 배치 서비스를 호출하기 위하여 스프링의 HessianProxyFactoryBean을 사용하며 배치 실행 후 결과 값으로 배치 실행정보를 출력한다.
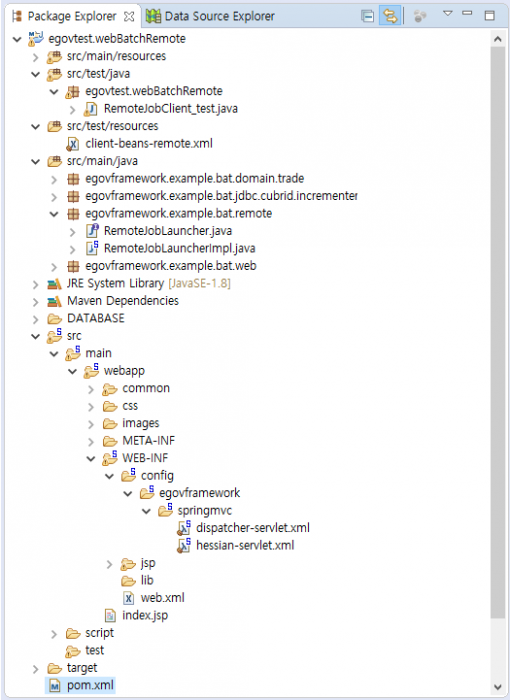
- 본 테스트 예제는 프로젝트의 src/test영역에 자바 클래스(RemoteJobClient_test)와 빈설정(client-beans-remote)파일로 구성되어 있다.
Step 1 HessainProxyFactoryBean에 RemoteJobLanucher를 등록한다.
인자값으로 serviceUrl을 지정할 수 있으며, serviceInterface를 지정하여 런처의 메소드를 실행할 수 있다.
<bean id="remoteHessianJobLauncher"
      class="org.springframework.remoting.caucho.HessianProxyFactoryBean">
	<property name="serviceUrl"
                  value="http://localhost:8080/egovframework.example.bat.template.sam.web/EgovJobLauncher.remote" />
	<property name="serviceInterface" value="egovframework.example.bat.remote.RemoteJobLauncher" />
</bean>
Step 2 테스트 파일을 작성하여 등록된 웹서비스를 호출한다.
아래와 같이 테스트 파일을 작성하여 웹서비스를 호출하며 템플릿 예제의 “delimitedToDelimitedJob” 배치 job을 실행하여 결과로 Job Instance 및 step Info를 출력한다.
package egovtest.webBatchRemote;

import org.springframework.context.ApplicationContext;
...
import egovframework.example.bat.remote.RemoteJobLauncher;

public class RemoteJobClient_test {

public static void main(String[] args) {
		ApplicationContext context = new ClassPathXmlApplicationContext("client-beans-remote.xml");
		RemoteJobLauncher remoteJobLauncher = (RemoteJobLauncher) context.getBean("remoteHessianJobLauncher");
		String jobName = "delimitedToDelimitedJob";

		HashMap<String,Object> map = (HashMap<String, Object>)remoteJobLauncher.callRemoteBatchRunner(jobName);

		HashMap<String, Object> jobInstances = (HashMap<String, Object>) map.get("jobInstances");
		List<HashMap<String, Object>> stepsInfo = (ArrayList<HashMap<String, Object>>)map.get("stepsInfo");

		System.out.println("[jobInstance] ===============================================================");
		System.out.println("job id = "+jobInstances.get("id"));
		System.out.println("job name = "+jobInstances.get("name"));
		System.out.println("parameters = "+jobInstances.get("parameters"));
		System.out.println("startTime = "+jobInstances.get("startTime"));
		System.out.println("endTime = "+jobInstances.get("endTime"));
		System.out.println("isRunning = "+ ((boolean)jobInstances.get("isRunning") ? "Running" : "Ready"));
		System.out.println("exitStatus = "+jobInstances.get("exitStatus"));

		System.out.println("[stepsInfo] ===============================================================");
		for(HashMap<String,Object> stepInfo : stepsInfo) {
			System.out.println("stepId = "+stepInfo.get("stepId"));
			System.out.println("stepName = "+stepInfo.get("stepName"));
			System.out.println("readCount = "+stepInfo.get("readCount"));
			System.out.println("writeCount = "+stepInfo.get("writeCount"));
			System.out.println("readSkipCount = "+stepInfo.get("readSkipCount"));
			System.out.println("processSkipCount = "+stepInfo.get("processSkipCount"));
			System.out.println("writeSkipCount = "+stepInfo.get("writeSkipCount"));
			System.out.println("totalSkipCount = "+stepInfo.get("totalSkipCount"));
			System.out.println("commitCount = "+stepInfo.get("commitCount"));
			System.out.println("rollbackCount = "+stepInfo.get("rollbackCount"));
			System.out.println("exitStatus = "+stepInfo.get("exitStatus"));
		}
	}
}
출력 결과
[jobInstance] ===============================================================
job id = 0
job name = delimitedToDelimitedJob
parameters = {inputFile=classpath:/egovframework/batch/data/inputs/csvData.csv, outputFile=file:xxxxx/remote-batch-output/csvOutput_xxxx.csv, timestamp=xxxxxxxxxxx}
startTime = 201x-xx-xx xx:xx:xx.xxx
endTime = 201x-xx-xx xx:xx:xx.xxx
isRunning = Ready
exitStatus = COMPLETED
[stepsInfo] ===============================================================
stepId = 0
stepName = delimitedToDelimitedStep
readCount = 4
writeCount = 4
readSkipCount = 0
processSkipCount = 0
writeSkipCount = 0
totalSkipCount = 0
commitCount = 3
rollbackCount = 0
exitStatus = COMPLETED
참고자료
전자정부 표준프레임워크 라이센스(바로가기)
전자정부 표준프레임워크 활용의 안정성 보장을 위해 위험성을 지속적으로 모니터링하고 있으나, 오픈소스의 특성상 문제가 발생할 수 있습니다.
전자정부 표준프레임워크는 Apache 2.0 라이선스를 따르고 있는 오픈소스 프로그램입니다. Apache 2.0 라이선스에 따라 표준프레임워크를 활용하여 발생된 업무중단, 컴퓨터 고장 또는 오동작으로 인한 손해 등에 대해서 책임이 없습니다.
